If you’re new to Facebook advertising, you might find it overwhelming.
If you’ve dipped your toes in, without any real understanding, you might have decided that there’s little value in it and that it’s just a waste of money.
Before you shut it down for good, read our two-part guide on Facebook advertising tips and advice.
We’ll help you ensure you’re creating ads that not only look good (generating that click!) but are also targeted to people who are actually interested in your product, service, or brand.
First thing’s first: you need to be creating and monitoring Facebook ads that fulfil an objective.
So where do we begin? Well, we actually just said it.
It’s your advertising objective…
Choosing a Facebook ad objective
On Facebook, there are almost a dozen options for you to choose from when you begin creating an ad.
That’s not to say you need to be creating 11 different ads to satisfy all goals! When you’re starting out, you can pick perhaps the few that are most applicable to your website and business.
Now as I said, there are 11 objectives on Facebook. I, however, tend to focus on these three:
- Boost your posts
- Promote your Page
- Send people to your website
I often like to focus on these three objectives, as they can be used across each of the three targeting options we are about to go over, and they are the ones that can be applied to almost any business, any industry, and any product or service.
Let’s gloss over each.
1. Boost your posts
The main objective here is to increase on-page engagement for a particular post. You can Boost a post for as little as $1 for one day.
Say you’ve just published an update to Facebook promoting a great new blog post on your website.
Thanks to Facebook’s restrictions around organic reach (quick recap: organic reach is down to about 2% of your total audience – hence the huge shift towards advertising!), you’ve only reached a handful of people.
🔊 So, why Boost a post?
The ‘Boost’ functionality can increase reach and engagement for this particular post.
You can quickly boost a post to your existing fans (so people who have already ‘Liked’ your page, but who are unlikely to see your post due to the organic reach decrease) or, you can choose some basic targeting options including location, age, gender, and interests.
You have complete control over your own budget (either total or daily); the only thing you need to adhere is Facebook’s requirement that you spend at least $1 per day. Your budget will also dictate how many people you’re estimated to reach.
Boosting a post is a quick and easy advertising technique to increase on-page engagement for a particular post.
2. Promote a Page
This is a great method that should initially be used when you first create your Facebook page.
👍 What’s in a Like?
Now, we have said many times how vanity metrics such as the number of ‘fans’ a page has offers very little to the true value of social media, but I think about it this way: if you were to create an ad, from your page, linking to an external website (like your landing page), you still need to prepare for the people who don’t click on the link itself, but rather click through to your Facebook page.
Maybe they’ve never heard of you and want to visit your Facebook page to find out a little more about you before they decide that they want to take the time to further investigate your website.
So if you’re promoting from a page that has zero fans (and is posting zero content), and someone decides to visit the page (rather than the link you’re promoting) it looks a little… uninviting.
This is also why we encourage you to start posting on you page, even when you haven’t started building your fan base. After a week’s worth of posts, you can now create an ad promoting your page, and when someone visits, yes, they might see a brand new page, but it will be a lively one, too.
Now that you’ve set up a solid posting schedule, you can create an ad encouraging people to like your brand new page…
📣 Create an ad to promote your page
When you create such an ad, there really isn’t too much room for flowery, decorated, creative writing.
In Facebook’s Ads Manager, you’re limited in your copy; you’re offered just 90 characters for the text and 25 characters for the headline (which only shows up on right-hand side desktop ads).
90 characters to encourage people to like my page?
Yep, so you better be snappy, bright, clear, and helpful… all in about 20 words!
You can a daily or total budget here, and target very specifically.
As you create your ads, Facebook will give you an indicator as to how targeted your audience is. If you’re too broad, you risk a poor click-through rate (CTR), as ads are not highly targeted to a high quality audience.
If targeting is too specific, Facebook will likely tell you that there are too few people in your audience for your ad to be shown.
3. Send users to your website
The general practice for this ad objective is very similar to the two we have already described, but it offers a little more functionality for you to create attractive and eye-catching Link ads.
Instead of choosing a specific Page or Page Post to promote, you can promote any external link. That might be a link to:
- A new blog post
- Some company news
- An product page
- A landing page
- A contact page
Or any other page, content, or form you want to promote!
Below are some examples of Facebook ads from the right-hand side of my page. Notice the clear, bright, beautiful images and concise text? (Love the Emoji use in that second one, too!)
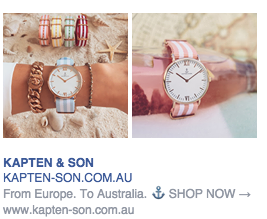
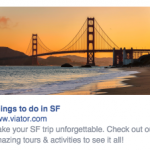
Note: these ads do not appear as native posts on your page; they are shown exclusively as ads in the News Feed and right-hand side across desktop and mobile.
There are four essential elements of a Link ad:
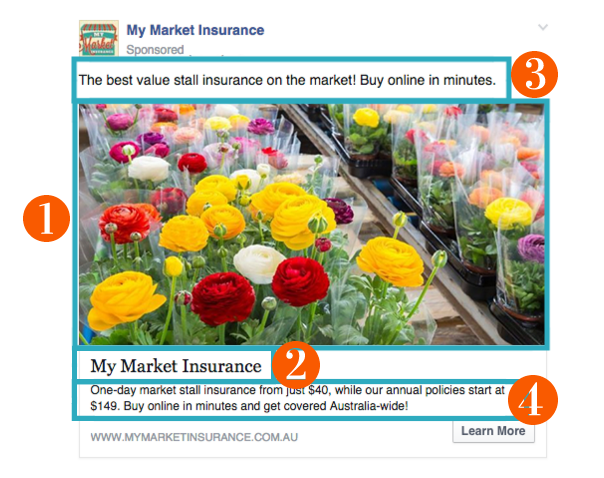
1. The image 📷
Choose a clear, bright, relevant image to catch the eye of users scrolling through their feeds. You can add a small piece of text to the image, e.g. “From $19.95!” “On sale now!” “Sign up in minutes!” etc. to further capture attention.
Please be aware though, that you can only have up to 20% text in an image for an ad.
There has been some inconsistency over the years with this rule, with some businesses getting away with more text and others having their ads rejected, but to avoid the wasted time of having to re-launch ads and edit graphics, keep the text to a bare minimum.
Facebook says this rule keeps ads clutter-free and reduces the spammy feel. Personally, I agree with them.
Facebook also has an online grid tool where you can upload your image and shade squares to measure what percentage contains text. Again, this tool is not without its flaws, and each ad is subject to Facebook approval.
2. The headline 📰
This is the larger text that appears directly under the image. It’s likely to be the first element people read when they see your ad. You’re allowed only 25 characters in your headline.
3. The text 📇
This is where you can tell a little bit more about the page or promotion you’re offering. You have 90 characters here to help reinforce the message or encourage a click.
4. The News Feed link description 📝
Finally, a bit of breathing room!
A 200-character allowance lets you tell more about your offer, your brand, special features, time limits, and reinforces a CTA to get users curious to find out more.
This space is actually hidden behind an extra click when you’re creating ads. You need to click ‘Show Advanced Options’ where a box will drop down and you can enter additional text.
Take a specific post, a brand new Facebook page, or an external link and use specific targeting – plus your own budget and campaign running time! – and start increasing on-page engagement and Facebook referrals to your website.
Part Two
Next week, we take a look at three popular ways to target. In the meantime, follow us on Twitter or Like us on Facebook to keep up-to-date on all things social media.